Let’s be honest – there’s nothing quite like the feeling of throwing down a monster slam dunk. It’s basketball’s ultimate exclamation point, that jaw-dropping moment that has everyone in the gym losing their minds. And here’s the thing: you don’t actually have to be a giant to do it! Just look at Spud Webb (5’7″) or Nate Robinson (5’9″) who were literally dunking on people a foot taller than them. Height helps, sure, but it’s not the whole story.
So what’s the real secret? Explosive power – and lots of it. But before you start training like a madman, you need to know exactly how high you actually need to jump to make it happen. That’s where the math comes in (don’t worry, I’m not about to make you solve equations).
Good news: I’ve put together what I think is the most comprehensive dunk calculator you’ll find anywhere. This isn’t just some basic “subtract your height from the rim” tool. We’re talking physics, personalized analysis, and a real training roadmap that’ll take you from wishful thinking to rim-rocking reality.
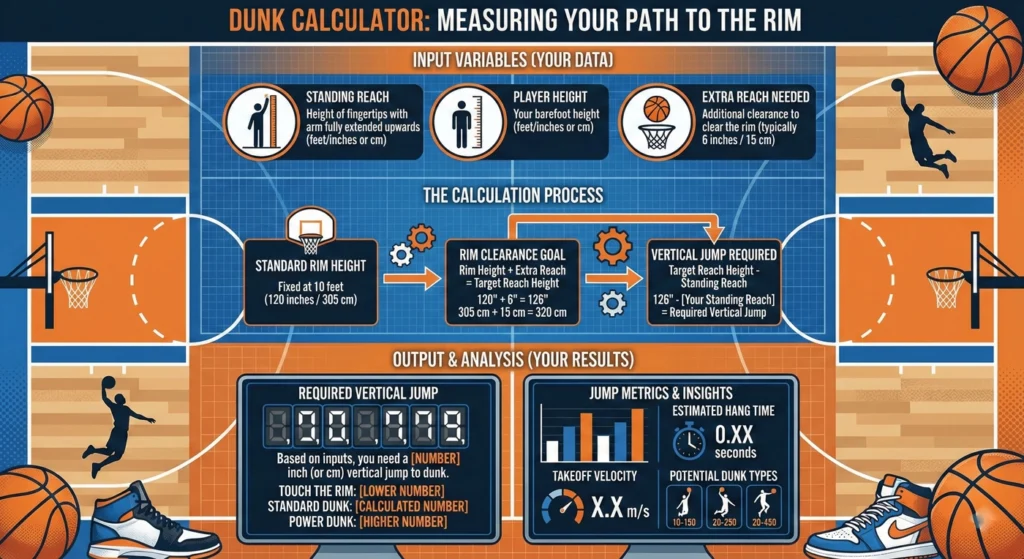
The basic math is simple: Rim Height + Ball Clearance – Your Standing Reach = How High You Need to Jump. But as you’ll see, there’s a bit more to it if you want to get serious. Let’s dive in and figure out if you’re closer to dunking than you think!
Interactive Tool: Dunk Calculator

Find Your Exact Dunk Requirements
Your Measurements:
- Height: [Input field] feet [Input field] inches
- Wingspan: [Input field] feet [Input field] inches
- Standing Reach: [Auto-calculated or custom input]
- Current Vertical Leap: [Input field] inches
- Hoop Height: [Default 10ft/120 inches with dropdown for other options]
- Extra Reach Needed for Dunk: [Default 6 inches with tooltip explaining this is for ball clearance]
Your Results:
- Required Vertical to Touch the Rim: [Calculated result]
- Required Vertical to Dunk a Basketball: [Calculated result]
- Your Dunk Potential Rating: [Rating based on current vs. required vertical]
Mastering the Fundamentals: Standing Reach and the Calculation Formula
What is Standing Reach and Why is it Critical?
Your standing reach might be the most underrated measurement in basketball – seriously! It’s simply how high you can reach with your arm extended while standing flat-footed. And let me tell you, this number is WAY more important than your height when it comes to dunking.
I’ve seen 6’2″ guys who can barely touch the net, and 5’10” guys who can nearly palm the rim without jumping. Why? Standing reach, baby! Some people have arms like orangutans (in the best possible way), while others… not so much.
Measuring it is super simple:
- Kick your shoes off and stand next to a wall
- Reach up as high as you possibly can (no tippy toes allowed!)
- Have a friend mark the spot or measure directly
- That’s your standing reach!
Fun fact: NBA teams obsess over standing reach in the draft combine because they know height can be misleading. A 6’6″ player with a 8’9″ standing reach is functionally “taller” than a 6’8″ player with an 8’6″ standing reach. Mind-blowing, right?
The Simple Formula Behind the Dunk Calculator (for Transparency)
I’m not trying to hide anything behind fancy algorithms here, so let’s break down exactly how this works:
Vertical Needed = Dunk Target Height – Standing Reach
Where:
- Dunk Target Height = Rim Height (usually 10ft/120 inches) + Ball Clearance (about 6 inches)
- Standing Reach = Your measurement from above
So if you’re looking at a standard 10-foot rim and need 6 inches of clearance to properly dunk the ball, your target height is 126 inches. If your standing reach is 8 feet (96 inches), you’ll need a 30-inch vertical jump to dunk (126 – 96 = 30).
Simple, right? But there’s more to jumping than just the height…
Performance Analysis: Beyond the Jump Height

The Visual Breakdown of Your Jump Arc
Dunking isn’t just about hitting a specific height – it’s about getting there with enough control, power, and hang time to actually do something with the ball. Let’s get a bit nerdy (in a cool way) about what your jump actually looks like:
Hang Time: This is how long you’re airborne during your jump. The average NBA player gets about 0.5-0.7 seconds of hang time, while freaks of nature like Michael Jordan could stay up for almost a full second! More hang time = more opportunity to perform more complex dunks.
Effective Hang Time: Even better than total hang time is how long you’re actually above rim level. If you can just barely graze the rim, your effective hang time is basically zero. But if you can get 6 inches above the rim? Now we’re talking serious dunk potential.
Speed of Dunk: How quickly can you reach your maximum height? Some people are explosive jumpers (think Russell Westbrook) who reach their peak almost instantly. Others build momentum more gradually. Explosive jumpers often make better in-game dunkers.
Takeoff Velocity: This is the initial speed you generate during your jump. Physics nerds know this directly correlates to your maximum height. The average NBA player generates about 13-15 feet per second of initial velocity!
Jump Energy: Want to get really scientific? Your jump energy can be calculated as: Energy = Body Mass × gravity × Vertical Jump Height
That’s literally how much energy you’re generating to get your body off the ground. Pretty cool to think about!
Benchmarks and Comparisons
Let’s be real – you want to know where you stand compared to others. Here’s a quick breakdown:
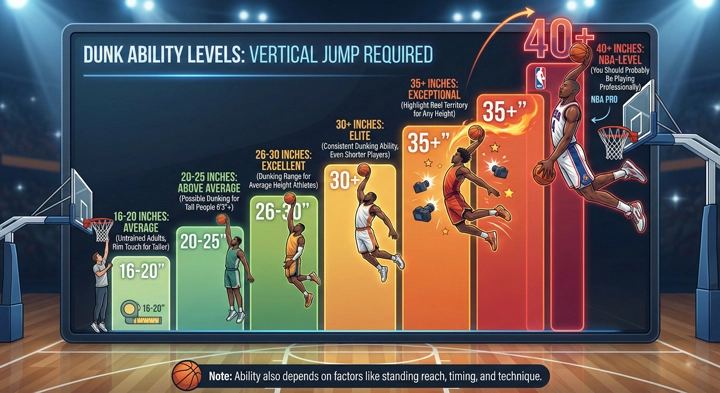
Dunk Ability Levels:

- 16-20 inches: Average for untrained adults (rim touching for taller people)
- 20-25 inches: Above average (possible dunking for tall people 6’3″+)
- 26-30 inches: Excellent (dunking range for average height athletes)
- 30+ inches: Elite (consistent dunking ability, even for shorter players)
- 35+ inches: Exceptional (highlight reel territory for any height)
- 40+ inches: NBA-level (you should probably be playing professionally)
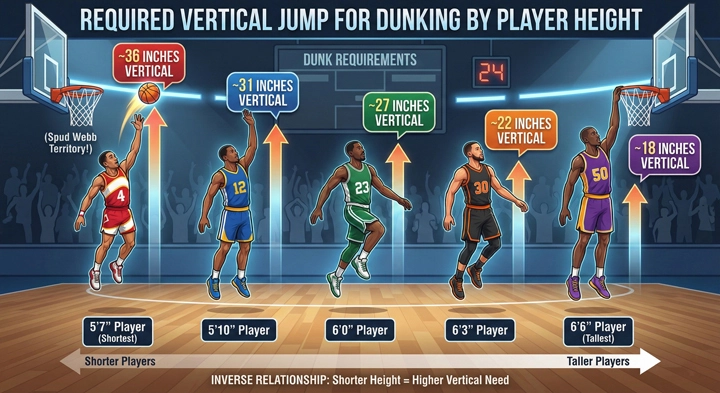
Required Vertical by Player Height:

- 5’7″ player needs ~36 inches vertical (Spud Webb territory)
- 5’10” player needs ~31 inches vertical
- 6’0″ player needs ~27 inches vertical
- 6’3″ player needs ~22 inches vertical
- 6’6″ player needs ~18 inches vertical
Elite Player Comparison: Just for fun, the average NBA player is about 6’6″ with a standing reach around 8’7″ and a vertical leap around 28-30 inches. That’s why they make dunking look easy – their standing reach is already just 17 inches from the rim!
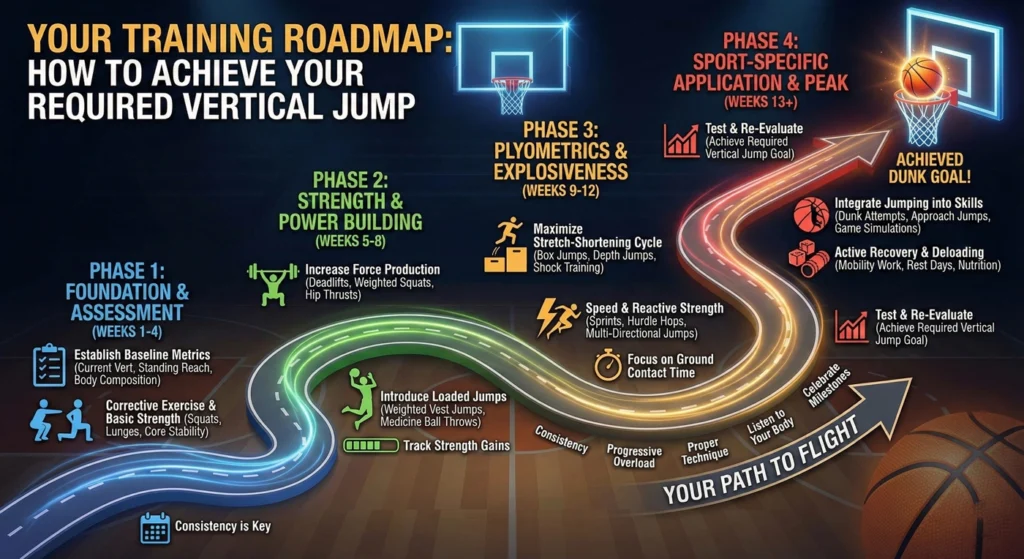
Your Training Roadmap: How to Achieve Your Required Vertical Jump

Critical Factors Affecting Dunking Ability
Let’s be super clear about something: dunking is about a LOT more than just “jumping higher.” Here are the real factors that’ll determine if you’re throwing down or throwing tantrums:
- Standing reach – As we’ve discussed, this is your baseline. Some people just hit the genetic lottery here.
- Explosive leg strength – Your legs are basically the engine for your jump. The more power they can generate in a split second, the higher you’ll go.
- Power-to-weight ratio – A 160-pound guy with moderate leg strength might jump higher than a 220-pound guy with greater strength. Physics doesn’t care about your excuses!
- Technical approach – Ever notice how your running jump is higher than your standing jump? Technique and approach matter hugely.
Pro Tips for Improving Vertical Jump
Ready to put in the work? Let’s break down your training plan:
Phase 1: Strength Training (Weeks 1-8) You need to build your foundation before you can build your skyscraper. Focus on:
- Squats (aim for 1.5x your bodyweight)
- Deadlifts (target 2x your bodyweight)
- Bulgarian split squats (these are brutal but effective!)
- Calf raises (3 sets of 15-20, 3 times weekly)
Look, I’m not gonna lie – this phase isn’t the most exciting, but it’s absolutely essential. Skip it at your peril!
Phase 2: Plyometrics (Weeks 9-16) Now we’re getting to the fun stuff! This is where you teach those muscles to EXPLODE:
- Box jumps (start lower than you think, focus on landing softly)
- Depth jumps (my personal favorite – drop from a box, then immediately jump as high as possible)
- Tuck jumps (great for training that quick twitch response)
- Single leg bounds (for those who want to dunk off one foot)
Technique Refinement: Did you know that a proper arm swing can add 2-4 inches to your vertical? That’s free inches just from moving your arms correctly! Practice jumping with a strong, explosive upward arm motion.
Also, figure out if you’re a one-foot or two-foot jumper. Most people have a natural preference, and it can make a HUGE difference. Michael Jordan and Zach LaVine? One-foot jumpers. Shawn Kemp and Blake Griffin? Two-foot jumpers.
Monitoring Progress: Don’t just train blindly – track your progress! Every 2-3 weeks, test your vertical and see if you’re improving. There are tons of apps like VertiCoach or JumpBoost that can help with this.
Here’s the tough love part: expect to spend 6-8 months of consistent training to see your full potential. Jumping higher isn’t something that happens overnight – it’s earned through hundreds of sessions in the gym.
Safety and Progression
I don’t want you getting hurt trying to be the next Vince Carter, so listen up:
- Start with a lower rim! Seriously, an 8 or 9-foot rim lets you practice the dunking motion without needing a massive vertical.
- Focus on landing softly – your knees will thank you when you’re 40.
- Consider getting a jump program or coach if you’re serious. I’m giving you good info here, but personalized coaching is worth its weight in gold.
- Remember that rest days are when you actually get stronger – don’t skip them!
Frequently Asked Questions
Can a 5’9″ guy dunk?
Absolutely! But let’s be real – you’ll need to be an exceptional jumper with about 30-35 inches of vertical. Nate Robinson is 5’9″ with a reported 43-inch vertical, which is why he could not only dunk but win dunk contests against giants. It’s totally possible, but you’ll need to be in the top percentile of jumping ability. Put in the work and you might surprise yourself!
How high do NBA players jump?
The average NBA vertical is around 28-32 inches, which is already elite. But the high-flyers? Guys like Zach LaVine and Derrick Jones Jr. have tested at 40+ inches. The official NBA combine record is 48 inches by D.J. Stephens in 2013, which is just absurd. For perspective, that’s like jumping up and touching a standard ceiling in most homes!
What is the average NBA hang time?
Despite what some highlight videos might make you think, even NBA players aren’t defying gravity! Most players have a hang time under one second. Michael Jordan in his prime reportedly had about 0.92 seconds of hang time. That doesn’t sound like much, but when you’re watching, it feels like they’re floating!
How do I measure my vertical jump accurately?
The wall mark method is your best DIY option:
- Stand facing a wall, feet flat
- Mark your standing reach with chalk or tape
- Jump as high as you can and make another mark (or have someone mark it)
- Measure the distance between the marks
Pro tip: Do this when you’re fresh, not after leg day at the gym. And try it a few times to get your true max!
Is it harder to dunk off one or two feet?
It depends on YOUR body and athletic style:
- One-foot jumping is usually better for speed approaches, like fast breaks
- Two-foot jumping typically provides more power, especially for shorter players
- Lighter, lankier players often excel at one-foot jumps
- Stronger, more compact athletes frequently do better with two-foot jumps
Try both styles and see which gives you more height. Most people are naturally better at one or the other!
Conclusion: Ready to Take the Leap
So there you have it – everything you need to know about whether you can dunk and exactly what you need to do to make it happen! The dunk calculator gives you the cold, hard numbers, but remember that your dunk journey is about more than just digits on a screen.
I’ve seen people transform from barely touching the net to throwing down nasty dunks in under a year of dedicated training. The human body is truly amazing when you push it consistently and intelligently.
Start with knowing your numbers – standing reach, required vertical, current vertical – and then attack your training with the roadmap I’ve laid out. Track your progress, celebrate your gains (even the small ones), and keep pushing.
Before you know it, you’ll be catching bodies at your local gym and making highlight reels of your own! Just remember to tag me when you post that first dunk video – I want to celebrate with you!